Use the Card Request Management app
Help for Card Office users processing card requests and changes to card details. Includes how-to guides and where to get help
This guidance is for Card Office users of the Card Request Management app
This guidance is for Card Office staff who process requests for new cards and changes to card details received via the Card Request Management app. This app is part of the new University Card Service, which is being rolled out by the IT Services Card Stabilisation project with colleagues from the Card Office.
The service is currently available to a selection of University HR teams and will be released to further card administration teams across the University throughout summer 2023.
HR teams not yet introduced to the new service will continue to use the existing paper/PDF form process for card applications until they become users of the Card Request Management app.
How-to guides
- Once you sign in to the system, your default view will be loaded.
- Note: Unless you set a new default, this will be the Requests waiting for the Card Office view
- Note: If your default view is not loaded, click the ‘Card requests’ option in the left-hand menu (label 1 in the screenshot below).
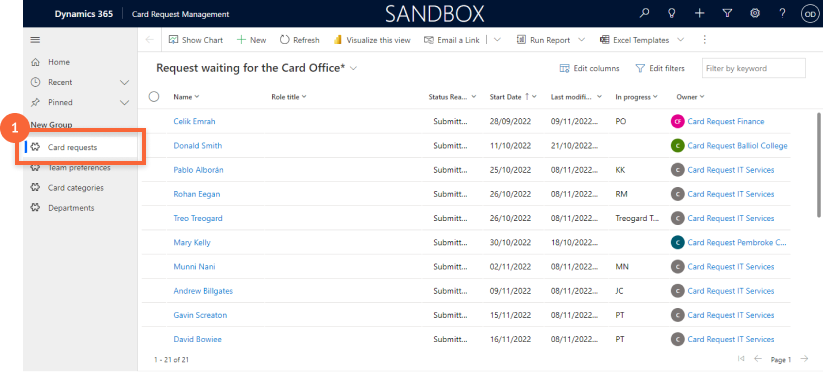
’Requests waiting for the Card Office’ view is the default Card Office view of the card request system (unless another view is set). You can navigate to the default view by clicking on ‘Card requests’ in the left-hand menu (label 1 in the screenshot).
The 'Requests waiting for the Card Office' view provides the following information for pending Card requests:
- Name (of the new starter)
- Role title
- Status reason
- Start date (the date the new role starts)
- Last modified On (the date the request was last updated)
- Owner (the HR team that owns the request — i.e. the team that submitted the request to the Card Office)
In either the 'Requests waiting for the Card Office' or ‘All active Card requests’ view, you can sort, filter and search by new starter name for requests.
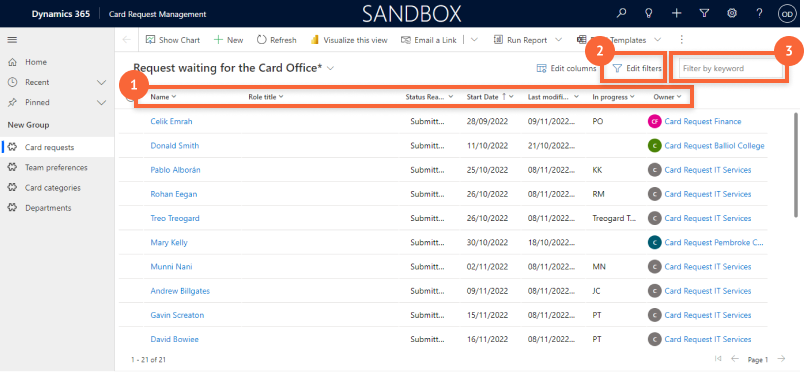
Sort, filter and search by name for Card requests
- Sort: click on the table column headers to choose a sort order — e.g. by most recently modified. See label 1 in the screenshot above.
- Filter: click on the ‘Edit filters’ option above the table (label 2 in the screenshot above) to create a query based on any of the data types used in the Card requests — e.g. find requests whose status is 'Submitted to Card Office’ AND Card category is ‘Academic visitor’.
- Search by name: enter part or all of the new starter’s name in the search field and press Enter (see label 3 in the screenshot above).
To review a Card request:
- Find the relevant Card request
- Click the name of the person (in the ‘Name’ column) to enter into the request record
- Review the information in the request record
- Note: to view the uploaded ID photo, you will need to view the ID photo section and click the filename of the image to open a pop-out box containing the image.
The Card Request System and the system for issuing new Cards are separate systems. There is no technical integration between the systems, which means data that needs to be transferred between the systems must be moved manually.
To transfer data from the Card Request system:
- In the Card Request System, click into the relevant request record
- Find the data that needs to be transferred (e.g. the ‘Preferred name’)
- Use your cursor to highlight the data
- Copy the data to your clipboard (Ctrl + C, or right-click and select ‘Copy’ from the pop-out menu)
- Navigate to the relevant place in the Card issuing system
- Paste the data
To transfer a new starter’s ID photo:
- Go to the ‘ID photo’ section of the request
- Click the image’s filename to open a pop-out box to view the image
- In the pop-out image box, click ‘Download’
- Upload the photo to the relevant place in the Card issuing system
A request is completed when its status is saved as ‘Card created’. A Card number needs to be added to the request record before it can be saved in ‘Card created’ status — this number is generated for the new starter in the (separate) Card issuing system.
To complete a request:
- Generate a (or find the recently-generated) Card number in the Card issuing system
- Copy the number to your clipboard (Ctrl + C)
- Navigate to the request record in the Card Request System
- In the request record, view the Card request status section at the bottom of the form
- Change the status to ‘Card created’
- A new input field of ‘Card number’ is displayed
- Enter/paste the card number
- Save (using the Save button in the toolbar at the top of the screen)
Note: On Save, an automated email will be sent to the HR Administrator and new starter, including the ‘Card number’ you supply.
If any of the information provided in the request is incorrect or needs amendments, you can return the request to the HR team and state why it is being returned. To reject a request:
- in the request record, view the Card request status section at the bottom of the form
- change the status to ‘Rejected by Card Office’
- a new input field ‘Reason for rejection’ is displayed
- enter a reason for rejection
- Save (using the Save button in the toolbar at the top of the screen)
Note: On Save, the reason for rejection message will be sent to the owning HR team in an automated email. The Card request will reappear in the HR team’s ‘Requests waiting for local HR’ view, and no longer be displayed in the ‘Requests waiting for the Card Office’ view. The HR team will then be responsible for: updating the request; asking the new starter to amend the information; or, cancelling the request.
At the top of the screen, under the toolbar, there is a title in bold text — by default this will be “Requests waiting for the Card Office”. This indicates the view of the Card Request System you are currently in.
As a Card Office user, you have access to six views:
- Requests waiting for the Card Office (default view):
- Shows all Card requests that have been submitted to the Card Office by HR teams.
- You’re likely to spend most of your time in the Card Request System working from this view.
- Requests waiting for local HR:
- Shows all Card requests waiting for an HR Administrator to do something with.
- You are unlikely to need to look at this view.
- This view is the main view used by HR Administrators, but they will only see Card requests for their team, whereas you will see all Card requests from all HR teams.
- Requests waiting for the Card applicant:
- Shows card requests waiting for the new starter (aka the ‘Card applicant’) to provide or amend their required information (via the online Card request form).
- You are unlikely to need to look at this view.
- This view will mainly be used by HR Administrators, but they will only see Card requests for their team, whereas you will see all Card requests from all teams.
- All active Card requests:
- This shows all card requests that are currently in progress — i.e. requests in any status, except ‘Cancelled’ or ‘Card created’.
- If you need to find a Card request but you don’t know what status it is in, this is a good place to look.
- Cancelled requests:
- All requests that are in ‘Cancelled’ status (requests can be cancelled by either Card Office or HR Admin users).
- Completed requests:
- All requests that the Card Office have saved with a status of ‘Card created’.
You can set a preferred default view. To set a default view:
- Click the title of the current view (label 1 in the screenshot below)
- Select the view you want to set as the default (label 2 in the screenshot below)
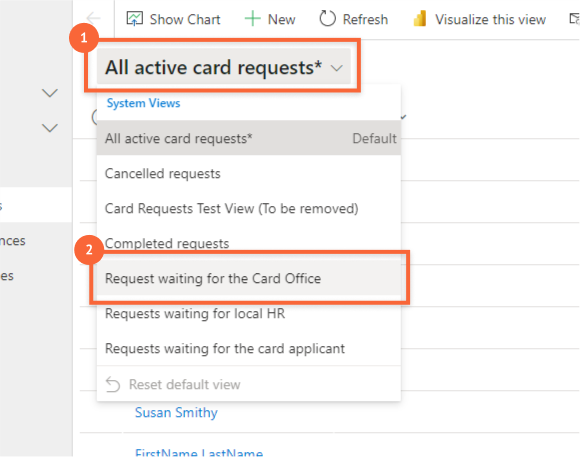
Set a default view - steps one and two
- When you are viewing that view, click the view title to open the dropdown list again (label 3 in the screenshot below)
-
At the bottom of the Views dropdown list, click ‘Set current view as my default’ (label 4 in the screenshot below)
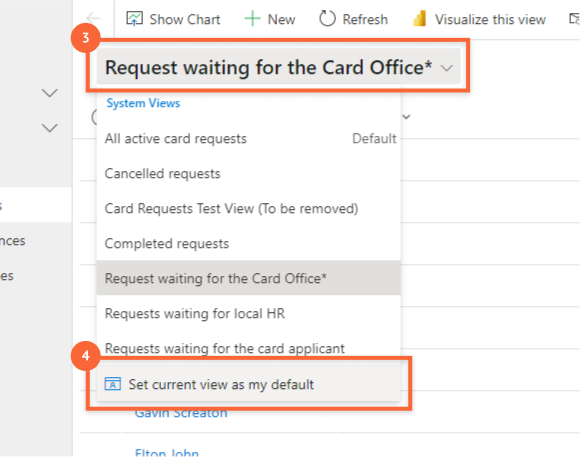
Set a default view steps three and four
Requests in the Card Request System can be in one of eight statuses.
The ‘happy path’ statuses are:
- Draft
- Card applicant to complete
- Awaiting HR review
- Submitted to Card Office
- Card created
Note: the ‘happy path’ is the ideal business process — i.e. the process when everything runs smoothly and there are no errors, rejections, cancellations, etc.
Additional statuses:
- Changes needed by applicant
- Rejected by Card Office
- Cancelled
See the figure below for information about how requests can move between each status and the team/person responsible for the request at each status.
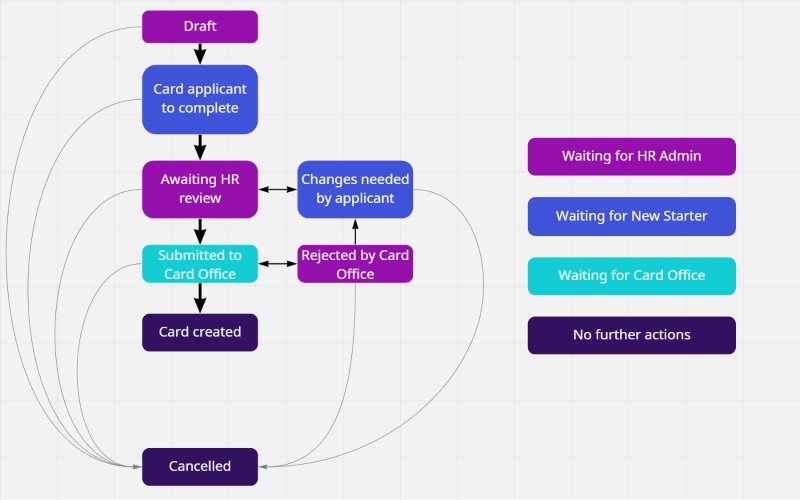
Card Request System statuses and responsible actors for each status.
Last update:
24 May 2023
Access the Card Request Management app
Opens in a new tab. Login using your SSO.
Select Card Request Management from the list of available apps.
Get help
Support for Card Office users of the Card Request Management app


